BASIC認証の代わりにOTPのトークンで認証してみる
せっかくなので、BASIC認証の代わりにOTPのトークンで認証できるように設定してみましょう。
昨日の続きと言えば続き。
前準備
$ sudo yum install -y httpd httpd-devel
$ sudo yum install -y openssl-devel
$ git clone https://github.com/archiecobbs/mod-authn-otp
$ cd mod-authn-otp
$ ./autogen.sh -c
$ make
$ sudo make install
Apacheにモジュール読み込み
$ sudo vi /etc/httpd/conf.modules.d/00-authn_otp.conf
$ sudo diff /etc/httpd/conf.modules.d/00-authn_otp.conf /etc/httpd/conf.modules.d/00-authn_otp.conf.bak
1,2d0
< LoadModule authn_otp_module   modules/mod_authn_otp.so
$ service httpd configtest
$ sudo systemctl restart httpd
ユーザーファイルを作る
$ vi ~/create_otp_userfile_sh
$ cat ~/create_otp_userfile_sh
#!/bin/bash -e
user=${1:?Usage: $0 username}
issuer=${2:-your_company_name}
secret=$(cat /dev/urandom | tr -dc 'a-z0-9' | fold -w 15 | head -n 1)
secret_base16=$(python -c "import base64; print base64.b16encode('${secret}')")
secret_base32=$(python -c "import base64; print base64.b32encode('${secret}')")
otpauth_uri="otpauth://totp/${issuer}:${user}?secret=${secret_base32}&issuer=${issuer}"
otpauth_uri=$(python -c "import urllib; print urllib.quote('${otpauth_uri}')")
qrcode_url="https://chart.googleapis.com/chart?chs=300x300&cht=qr&chl=${otpauth_uri}"

file="/var/www/otp/users"
if [ ! -f "${file}" ]; then
  [ -d $(dirname "$file") ] || mkdir -p $(dirname "$file")
  touch ${file}
  chown -R apache:apache $(dirname "$file")
fi
[ -w "${file}" ] || (echo "${file}: Permission denied" && exit 1)

count=$(awk "\$2 ~ /^$user}\$/" ${file} | wc -l)
if [ $count -le 0 ]; then
  echo "HOTP/T30 $(printf '%-12s' $user) - ${secret_base16}" >> ${file}
  echo "$qrcode_url"
else
  echo "User '$user' already exists"
fi
$ sudo ./create_otp_userfile_sh haray2 isaotestweb
出力されたURLにアクセスして、表示されたQRコードをアプリでスキャンして登録。
※ユーザーファイルの生成はこちらからスクリプトを借りました。
「引数にUsernameを指定して実行すると、必要な項目を埋めた行が /var/www/otp/users に追記され、標準出力にGoogle Authenticator登録用のQRコードが表示されるURLが出力されます。」という優しい仕様。ありがとうございます。
BASIC認証の設定
$ sudo vi /etc/httpd/conf/httpd.conf
$ diff /etc/httpd/conf/httpd.conf /etc/httpd/conf/httpd.conf.bak
159,170d158
< <Location />
<     AuthType Basic
<     AuthName "Mamoru OTP"
<     AuthBasicProvider OTP
<     Require valid-user
<     OTPAuthUsersFile /var/www/otp/users
<     OTPAuthMaxLinger 3600
<     OTPAuthMaxOTPFailure 20
<     OTPAuthPINAuthProvider file
<     OTPAuthLogoutOnIPChange On
< </Location>
$ service httpd configtest
$ sudo systemctl restart httpd
これで設定終わりです。 ブラウザからアクセスするとBASIC認証のダイアログが表示されるので、「ユーザー名」にはスクリプトで作成したユーザー名を、「パスワード」にはアプリに表示されているOTPを、それぞれ入力します。

CentOSの認証にTOTPを使う
個人的なメモを残しておきます。
前準備
$ sudo yum -y groupinstall "Development Tools"
$ sudo yum -y install pam-devel
Google Authenticatorのpamモジュールをインストールする
$ git clone https://github.com/google/google-authenticator-libpam.git
$ cd google-authenticator-libpam/
$ ./bootstrap.sh
$ ./configure
$ make
$ sudo make install
sshdとpamの設定
$ sudo cp /usr/local/lib/security/pam_google_authenticator.so /usr/lib64/security/
$ sudo cp -p /etc/ssh/sshd_config /etc/ssh/sshd_config.bak
$ sudo vi /etc/ssh/sshd_config
$ sudo diff /etc/ssh/sshd_config /etc/ssh/sshd_config.bak
82,83c82,83
< ChallengeResponseAuthentication yes
< #ChallengeResponseAuthentication no
---
> #ChallengeResponseAuthentication yes
> ChallengeResponseAuthentication no
$ sudo sshd -t
$ sudo systemctl restart sshd
$ sudo vi /etc/pam.d/google-auth
$ cat /etc/pam.d/google-auth
#%PAM-1.0
auth required pam_env.so
auth sufficient pam_google_authenticator.so try_first_pass
auth requisite pam_succeed_if.so uid >= 500 quiet
auth required pam_deny.so
$ sudo cp -p /etc/pam.d/sshd /etc/pam.d/sshd.bak
$ sudo vi /etc/pam.d/sshd
$ sudo diff /etc/pam.d/sshd /etc/pam.d/sshd.bak
3c3
< #auth       substack     password-auth
---
> auth       substack     password-auth
21,22d20
< auth substack google-auth
OTPの設定(このときにQRコードも表示されるのでアプリを設定する)
$ google-authenticator
sudoにも適用してみよう
$ sudo cp /etc/pam.d/sudo /etc/pam.d/sudo.bak
$ sudo vi /etc/pam.d/sudo
$ diff /etc/pam.d/sudo /etc/pam.d/sudo.bak
2d1
< auth       substack     google-auth
Azureの東日本から近い海外リージョンは?
今だと香港より韓国Regionのほうが近いんかな
— こすもす.えび (@kosmosebi) 2017年4月22日
「Azureの日本リージョンに何かあったときに東アジアに逃がす」という話の流れから、「香港より韓国の方が近いのでは?」という指摘を見かけたので実測してみました。
各リージョンにCentOSのVMを立てて、東日本のVMからnpingを100回ずつ飛ばしました。
sudo nping --tcp -c 100 -p 22 (宛先IPアドレス)
▼結果
東日本(japaneast)
Max rtt: 9.026ms | Min rtt: 0.629ms | Avg rtt: 1.179ms

西日本(japanwest)
Max rtt: 15.846ms | Min rtt: 8.869ms | Avg rtt: 9.298ms

東アジア(eastasia)
Max rtt: 55.422ms | Min rtt: 51.305ms | Avg rtt: 51.707ms

韓国中部(koreacentral)
Max rtt: 36.775ms | Min rtt: 34.438ms | Avg rtt: 34.722ms

韓国南部(koreasouth)
Max rtt: 44.547ms | Min rtt: 40.182ms | Avg rtt: 40.558ms
ということで、今のところ韓国中部(koreacentral)が近いようです。
(追記)
VM消す前に /proc/cpuinfo を見てみたら、韓国リージョンの方がCPUがちょっと新しくて早いようです。やっぱり新しいDCいいですね。
Intel(R) Xeon(R) CPU E5-2673 v3 @ 2.40GHz
東日本、西日本、東アジアはこんな感じ。
Intel(R) Xeon(R) CPU E5-2660 0 @ 2.20GHz
SQL Database のアップデート
Announcing Azure SQL Database Premium RS, 4TB storage options, and enhanced portal experience | Blog | Microsoft Azure azure.microsoft.com
こちらも少し古くなってしまいましたが、SQL Databaseについて2件。
いずれもパブリックプレビューです。
1つめは価格階層の新設。
「Premium RS」が設けられたようで、Premiumから性能は変えずに信頼性を落として(冗長度を下げて)安くしたということのようです。
ストレージの最大容量も500GBまで、となっていますね。
障害発生時には最大5分間分巻き戻る可能性があるということなので、テスト用や検証環境用にちょうど良さそうですね。
本番用でも、アクティブgeoレプリケーションを設定しておけば使えるような気はします。
2つめは、P11とP15でストレージの4TBオプションが追加されました。
追加費用無しで拡張できます。
おそらくプレビューゆえのようですが、現時点では次のような制約があります。
- いったん4TBに設定するとダウングレードできない
- 容量縮小できない
- アクティブgeoレプリケーションもP11かP15が必要
- Elastic Poolに追加できない
これに合わせてだと思いますが、ポータル上からスケール操作をする際のUIも変わりました。 価格階層(StandardとかPremiumとか)をタブで選んで、DTUとストレージサイズをスライダーで指定する形になっています。
Azure CLI 2.0 がリリースされていました
だいぶ出遅れましたが、Azure CLI 2.0 がリリースされていました。
Pythonベースになって取り回しも良くなりましたね。
–wait, –no-wait オプションが実用的で嬉しいところです。
Managed Disks の対応なんかは2.0のみになるようです。
Azure Command Line 2.0 now generally available | Blog | Microsoft Azure
インストールの手順はこちら。手軽なのはDockerですかね。
実用的な使いこなしはこちらがおすすめ。 ホスト側のファイルシステムに認証トークンを保管しているあたりがハイライトでしょうか。
仮想マシンのAv2シリーズが利用可能に
仮想マシンのAv2シリーズが利用可能になっていたようです。
▼New generation of A-series instances for Azure Virtual Machines https://azure.microsoft.com/en-us/updates/new-generation-of-a-series-instances-for-azure-virtual-machines/
メモリの量が1コアあたり2GBもしくは8GB、テンポラリディスクはSSDが付く用です。 ランダムのIOPSが既存のAシリーズより2倍~10倍高速とありますが、DSシリーズのようなキャッシュ機構の改善でしょうか。
一部リージョンからの提供のようで、いま手元のサブスクリプションで確認できるのは以下4箇所でした。
- Central US
- East US 2
- North Europe
- West Central US
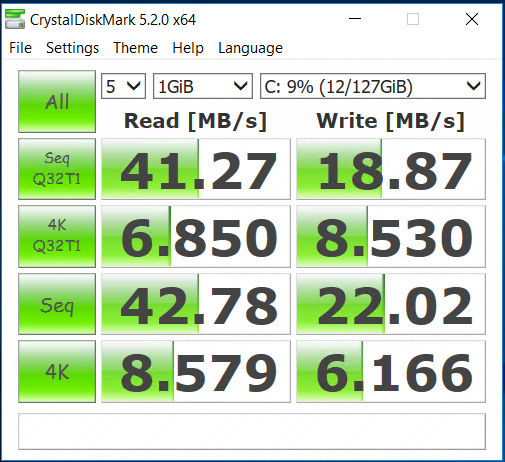
気になるのでWindows仮想マシンで軽くベンチマークを取ってみたのですが、確かにランダムI/OはCドライブもDドライブも向上してますね。
A2v1 / Cドライブ

A2v2 / Cドライブ

A2v1 / Dドライブ

A2v2 / Dドライブ

App Service 向けに、URL単位での認証機能がプレビュー
App Service 向けに、URL単位での認証機能がプレビューで提供され始めました。
▼URL Authorization Rules in App Service
https://azure.microsoft.com/en-us/updates/url-authorization-rules-in-app-service/
Web Apps の認証機能を設定した上で、authorization.json か authorization.yaml に認証ルールを記述しておくことで、たとえば特定ディレクトリだけ認証をかけたい、といったこともアプリ側の修正無しで実現できます。 web.config も書き換えずにすむので楽ですね。
詳しいやり方はこちら。 /admin に対して、未認証の場合はログインページにリダイレクトする、というルールをjsonに書いてドキュメントルートに置くだけ。