Azure Ev3シリーズ仮想マシンのストレージベンチマーク
こちらの記事の続き。
E4s_v3 Cドライブ

E4s_v3 Dドライブ

うーん、あんまり早くないですね…価格優先ということですかね。
▼米国東部2での比較
| インスタンスサイズ | 金額 |
|---|---|
| DS12 v2 | 44,242.71/月 |
| L4s | 41,434.85/月 |
| E4s v3 | 37,564.56/月 |
TerraformでAzure仮想マシンを作成する(Managed Disks編)
Terraformを使って、Managed Disksの付いた仮想マシンを作る簡単な手順です。 UnManaged Disksの場合はこちらの記事をどうぞ。
バーチャルマシンを ARM対応の Terraform を使ってプロビジョンしてみる - Qiita
ではさっそく。
Terraformのダウンロード
公式サイトから自分の環境用のバイナリを取得してパスの通った場所に置いて下さい。バイナリ1つで動作するのでセットアップの手間いらずでとても楽ですね。
Download Terraform - Terraform by HashiCorp
サービスプリンシパルの作成
Terraformを実行するためのアカウントのようなものですね。 CLI2.0で作るのが簡単なので、ポータルのAzure Cloud Shell から実行しましょう。 サブスクリプションが1つの環境であれば1行目は無くても大丈夫です。
az account set --subscription "[サブスクリプションID]"
az ad sp create-for-rbac --name "[アプリケーション名]" --role Contributor
2行目を実行したあとのレスポンスが大切です。以下の3項目はあとで使います。特に「password」はあとから参照できませんのでしっかり記録しておきましょう(パスワードリセットは可能です)。
- appId
- password
- tenant
サービスプリンシパルそのものについての説明はこちらへどうぞ。
AzureのサービスプリンシパルをCLI2.0から発行する - 浅草橋青空市場
Terraformの設定ファイルを書く
ここからが本番です。「.tf」という拡張子のファイルにどんどん書いていきます。
サービスプリンシパルやOSアカウントなどの認証情報は「.tfvars」に外出しして .gitignore に入れておくのが良いでしょう。.tfvars のデフォルトは「terraform.tfvars」です。これ以外のファイル名の場合は、terraformコマンド実行時にオプションで明示的に指定する必要があります。
ではまず.tfvarsの書式から。
default_user = "OSユーザー名"
default_password = "OSパスワード"
subscription_id = "AzureのサブスクリプションID"
client_id       = "AzureのサービスプリンシパルのクライアントID(appId)"
client_secret   = "Azureのサービスプリンシパルのパスワード(password)"
tenant_id       = "AzureのサービスプリンシパルのテナントID(tenant)"
続いて.tfのコード例。
Azure側で用意されているUbuntu16.04LTSの最新版から、データディスク付きのVMを作ります。
ストレージはもちろんManaged Disks。
ほぼ公式のサンプルを踏襲していますので、IPアドレスにタグが付いていたりしますのでお好みで。
variable "default_user" {}
variable "default_password" {}
variable "subscription_id" {}
variable "client_id" {}
variable "client_secret" {}
variable "tenant_id" {}

provider "azurerm" {
  subscription_id = "${var.subscription_id}"
  client_id       = "${var.client_id}"
  client_secret   = "${var.client_secret}"
  tenant_id       = "${var.tenant_id}"
}

resource "azurerm_resource_group" "test" {
  name = "harayTerraformDemo"
  location = "Japan East"
}

resource "azurerm_virtual_network" "test" {
  name = "tfvnet1"
  address_space = ["10.0.0.0/16"]
  location = "${azurerm_resource_group.test.location}"
  resource_group_name = "${azurerm_resource_group.test.name}"
}

resource "azurerm_subnet" "test" {
  name = "tfsubnet1"
  resource_group_name = "${azurerm_resource_group.test.name}"
  virtual_network_name = "${azurerm_virtual_network.test.name}"
  address_prefix = "10.0.2.0/24"
}

resource "azurerm_public_ip" "test" {
    name = "haraytfvm01PIP"
    location = "${azurerm_resource_group.test.location}"
    resource_group_name = "${azurerm_resource_group.test.name}"
    public_ip_address_allocation = "static"
    domain_name_label = "haraytfvm01"
    tags {
        environment = "test"
    }
}


resource "azurerm_network_interface" "test" {
  name = "haraytfvm01nic1"
  location = "${azurerm_resource_group.test.location}"
  resource_group_name = "${azurerm_resource_group.test.name}"

  ip_configuration {
      name = "haraytfvm01ip"
      subnet_id = "${azurerm_subnet.test.id}"
      private_ip_address_allocation = "dynamic"
      public_ip_address_id = "${azurerm_public_ip.test.id}"
  }
}

resource "azurerm_virtual_machine" "test" {
  name                  = "haraytfvm01"
  location              = "${azurerm_resource_group.test.location}"
  resource_group_name   = "${azurerm_resource_group.test.name}"
  network_interface_ids = ["${azurerm_network_interface.test.id}"]
  vm_size               = "Standard_DS1_v2"

  storage_image_reference {
    publisher = "Canonical"
    offer     = "UbuntuServer"
    sku       = "16.04-LTS"
    version   = "latest"
  }

  storage_os_disk {
    name              = "myosdisk1"
    caching           = "ReadWrite"
    create_option     = "FromImage"
    managed_disk_type = "Standard_LRS"
  }

  storage_data_disk {
    name              = "datadisk_new"
    managed_disk_type = "Standard_LRS"
    create_option     = "Empty"
    lun               = 0
    disk_size_gb      = "32"
  }

  os_profile {
    computer_name  = "haraytfvm01"
    admin_username = "${var.default_user}"
    admin_password = "${var.default_password}"
  }

  os_profile_linux_config {
    disable_password_authentication = false
  }

  tags {
    environment = "test"
  }
}
Terraformコマンドを実行する
.tf と .tfvars を同じディレクトリに置いてください。 まず全体像はこんな感じです。
- terraform plan : いわゆるdry-runを実行します。
- terraform apply : 実際プロビジョニングを行います。
- terraform plan -destroy : リソース削除のdry-runです。
- terraform destroy :  リソースを削除します。
plan オプションで確認してから実行、という流れですね。 .tfvars のファイル名が「terraform.tfvars」じゃない場合には、ファイル名を明示的に指定して下さい。
terraform plan -var-file myvmvars.tfvars
Managed Disks の場合、ストレージアカウントを考慮する必要がなくなりますのでより扱いやすくなりますね。
AzureのサービスプリンシパルをAzure CLI2.0から発行する
AzureをTerraformやAnsibleから制御したかったり、Azure Container Services から Kubernetes のクラスをデプロイするときなんかに必要となるのが「サービスプリンシパル」。 言葉が分かりづらいですが、SaaSでよくある「アプリケーションパスワード」みたいなものですね。
以前はこれの発行がわりと面倒だったのですが、Azure CLI 2.0 になって劇的に楽になりました。 Azure Cloud Shell から実行する前提で、ログイン等は省略してあります。
サービスプリンシパルの発行(CLI2.0対応版)
az account set --subscription "[サブスクリプションID]"
az ad sp create-for-rbac --name "[アプリケーション名]" --role Contributor
これだけです。
(追記: 2017/06/02)
「--role」オプションでRBACベースのロールを指定します。
例では、Ansible等を想定してリソースの読み書きなどが可能な「Contributor(=共同作業者)」としてありますが、こちらを参考に適切なロールを指定して下さい。情報の取得のみであれば「Reader」あたりでも間に合いますね。
(追記以上)
こんな感じのレスポンスが返ってきます。パスワードはあとから照会できませんので控えておきましょう。 パスワード以外の項目は、ポータルの「Azure Active Directory → アプリの登録」から確認できます。
{
    "appId": "[アプリケーションID]",
    "displayName": "[表示名]",
    "name": "[アプリケーションID/URI]",
    "password": "[パスワード]",
    "tenant": "[テナントID]"
}
発行したサービスプリンシパルでCLIからログインしてみる
az login --service-principal --username "[アプリケーションID/URI]" --password "[パスワード]" --tenant "[テナントID]"
公式のドキュメントはこちらからどうぞ。
(追記: 2017/06/01)
パスワードが分からなくなった場合は、ポータルからキーを新たに発行すれば良さそうです。 手順はこのあたりから。
複数のサブスクリプションを同じディレクトリ上で運用している場合、カレントのサブスクリプションにIAM(RBAC)権限が付与されるようです。思ったのと違うところに権限が付いた場合は、ポータル等から変更しておきましょう。
そもそもサービスプリンシパルって何?という説明はこちらの公式ドキュメントをどうぞ。
(追記: 2017/10/26)
Terraform が Azure CLI認証に対応したそうで、そもそもサービスプリンシパル無しで走らせられるようになりました。
Azure仮想マシン用ディスクが最大4TBまで拡張されたようです
build 2017 の発表に続いてリリースが出ました。
さっそく検証記事が上がっていました。
記事がPowerShellだったので、CLIでもやってみました。 …といっても、単にCLIからManaged Diskを作っているだけですね。 Azure Cloud Shell でできるので楽ですね。
アナウンスには「West US Central Region」と書いてありますが、Japan Eastでも大きなディスクを作るだけならできました。仮想マシンにアタッチするところでエラーになるようですね。
CLIからディスクを作成する
$ az disk create --resource-group [リソースグループ名] --name [ディスク名] --sku [Standard_LRS or Premium_LRS] --location [リージョン] --size-gb [ディスクサイズ]
ディスクサイズの最大は、リリースにもあるように4,095GBです。 –sku は、Premium Disk(SSD相当)の場合は「Premium_LRS」、Standard Disk(HDD相当)の場合は「Standard_LRS」です。
既存のディスクのサイズを変更する
$ az disk update --resource-group [リソースグループ名] --name [ディスク名] --size-gb [ディスクサイズ]
Azure Lシリーズ仮想マシンのストレージベンチマーク
3月に登場したLシリーズの仮想マシンですが、低遅延なワークロード向けに最適化されたストレージが接続されているということで、実際にベンチマークしてみました。 比較対象は、L4s(4core, 32GBメモリ)とDS12v2(4 core, 28GBメモリ)、いずれも東日本です。
Linux上でのベンチマーク
OracleのORIONを使います。Oracle DatabaseのようなI/Oを再現させるということで、現実的なベンチマークが取れます。バイナリ1つというのも楽でいいですね。
ダウンロードはこちらから。ライセンス規約への同意が必要なのでブラウザでアクセスして下さい。
http://www.oracle.com/technetwork/jp/topics/index-096484-ja.html
準備
$ gunzip orion_linux_x86-64.gz
$ chmod 755 orion_linux_x86-64
計測用ディレクトリとファイルの作成
$ sudo mkdir /datadrive/iotest
$ sudo dd if=/dev/zero of=/datadrive/iotest/testfile-010.dbf bs=1M count=1024
$ sudo dd if=/dev/zero of=/datadrive/iotest/testfile-020.dbf bs=1M count=1024
$ sudo dd if=/dev/zero of=/datadrive/iotest/testfile-030.dbf bs=1M count=1024
$ sudo dd if=/dev/zero of=/datadrive/iotest/testfile-040.dbf bs=1M count=1024
$ sudo dd if=/dev/zero of=/datadrive/iotest/testfile-050.dbf bs=1M count=1024
$ sudo dd if=/dev/zero of=/datadrive/iotest/testfile-060.dbf bs=1M count=1024
$ sudo dd if=/dev/zero of=/datadrive/iotest/testfile-070.dbf bs=1M count=1024
$ sudo dd if=/dev/zero of=/datadrive/iotest/testfile-080.dbf bs=1M count=1024
$ sudo dd if=/dev/zero of=/datadrive/iotest/testfile-090.dbf bs=1M count=1024
$ sudo dd if=/dev/zero of=/datadrive/iotest/testfile-100.dbf bs=1M count=1024
設定ファイルの作成
ORIONを配置したディレクトリで。
$ vi orion-test.lun
$ cat orion-test.lun
/datadrive/iotest/testfile-010.dbf
/datadrive/iotest/testfile-020.dbf
/datadrive/iotest/testfile-030.dbf
/datadrive/iotest/testfile-040.dbf
/datadrive/iotest/testfile-050.dbf
/datadrive/iotest/testfile-060.dbf
/datadrive/iotest/testfile-070.dbf
/datadrive/iotest/testfile-080.dbf
/datadrive/iotest/testfile-090.dbf
/datadrive/iotest/testfile-100.dbf
ベンチマークの実行(simpleモード: readのみ)
$ sudo ./orion_linux_x86-64 -run simple -testname orion-test -num_disks 1
ベンチマークの実行(advancedモード: read/write)
Writeの比率を20%に設定。
$ sudo ./orion_linux_x86-64 -run advanced -testname orion-test -write 20 -num_disks 1
結果のまとめ(IOPS)
| #1 | #2 | #3 | #4 | #5 | average | |||
|---|---|---|---|---|---|---|---|---|
| Resource Disk | simple | DS12v2 | 265,240 | 295,247 | 307,868 | 312,623 | 314,806 | 299,157 |
| L4s | 260,160 | 294,480 | 300,374 | 315,354 | 317,482 | 297,570 | ||
| advanced | DS12v2 | 4,902 | 105,021 | 150,353 | 151,570 | 151,631 | 112,695 | |
| L4s | 15,867 | 231,738 | 250,393 | 251,296 | 256,432 | 201,145 | ||
| Persistent Disk | simple | DS12v2 | 275,935 | 303,187 | 316,342 | 326,228 | 327,368 | 309,812 |
| L4s | 277,109 | 306,821 | 319,787 | 324,359 | 329,075 | 311,430 | ||
| advanced | DS12v2 | 73,683 | 84,010 | 89,240 | 86,708 | 84,707 | 83,670 | |
| L4s | 177,048 | 199,667 | 251,055 | 252,527 | 250,629 | 226,185 |
「Resource Disk」がいわゆる揮発する方(/mnt/resources)、「Persistent Disk」が永続的なディスク(/)です。
「simple」と「advanced」が実行モードの違いで、simpleが読み取りのみ、advancedが読み書き混在で、今回はwrite20%で計測しました。
writeが入るとだいぶ性能差が出るようですね。
結果のまとめ(Latency)
| #1 (ms) | #2 (ms) | #3 (ms) | #4 (ms) | #5 (ms) | average | |||
|---|---|---|---|---|---|---|---|---|
| Resource Disk | simple | DS12v2 | 0.000 | 0.010 | 0.010 | 0.010 | 0.020 | 0.010 |
| L4s | 0.000 | 0.010 | 0.010 | 0.010 | 0.020 | 0.010 | ||
| advanced | DS12v2 | 0.200 | 0.020 | 0.020 | 0.030 | 0.030 | 0.060 | |
| L4s | 0.060 | 0.010 | 0.010 | 0.020 | 0.020 | 0.024 | ||
| Persistent Disk | simple | DS12v2 | 0.000 | 0.010 | 0.010 | 0.010 | 0.010 | 0.008 |
| L4s | 0.000 | 0.010 | 0.010 | 0.010 | 0.010 | 0.008 | ||
| advanced | DS12v2 | 0.010 | 0.020 | 0.030 | 0.050 | 0.060 | 0.034 | |
| L4s | 0.010 | 0.010 | 0.010 | 0.020 | 0.020 | 0.014 |
こちらはレイテンシの測定結果です(ミリ秒)。
こちらも同様の傾向が見られますね。
Windows上でのベンチマーク
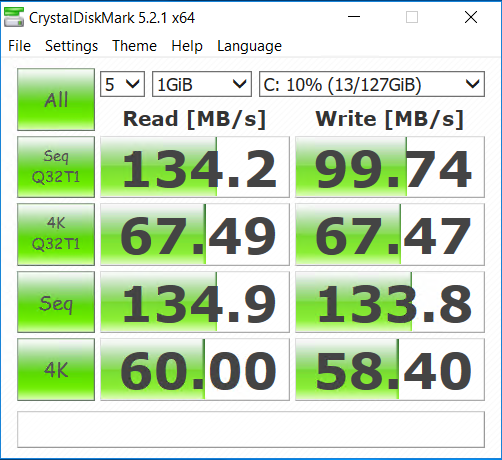
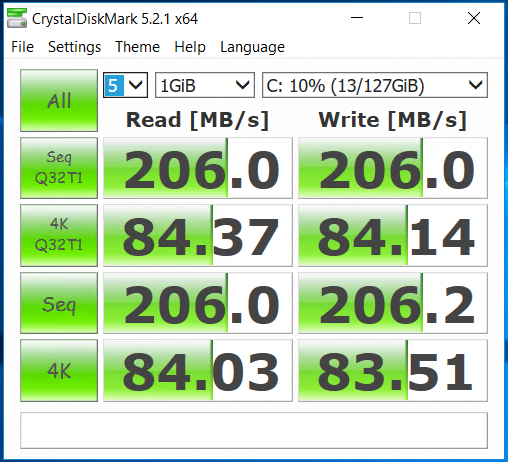
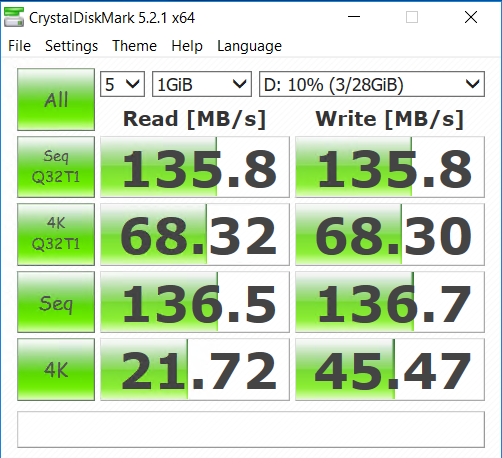
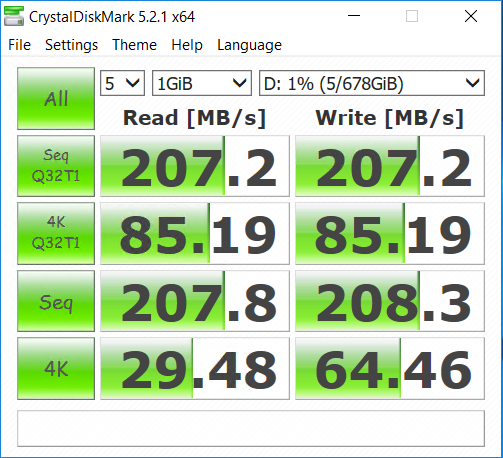
ついでにWindowsでも計測しました。CrystalDiskMarkでさらっと。
Windowsの場合はCドライブが永続的なディスク、Dドライブが揮発する方ですね。
Linuxと同じ傾向なので、やはりLシリーズのストレージは早いということになりそうです。
Cドライブでの比較
▼DS12v2

▼L4s

Dドライブでの比較
▼DS12v2

▼L4s

BASIC認証の代わりにOTPのトークンで認証してみる
せっかくなので、BASIC認証の代わりにOTPのトークンで認証できるように設定してみましょう。
昨日の続きと言えば続き。
前準備
$ sudo yum install -y httpd httpd-devel
$ sudo yum install -y openssl-devel
$ git clone https://github.com/archiecobbs/mod-authn-otp
$ cd mod-authn-otp
$ ./autogen.sh -c
$ make
$ sudo make install
Apacheにモジュール読み込み
$ sudo vi /etc/httpd/conf.modules.d/00-authn_otp.conf
$ sudo diff /etc/httpd/conf.modules.d/00-authn_otp.conf /etc/httpd/conf.modules.d/00-authn_otp.conf.bak
1,2d0
< LoadModule authn_otp_module   modules/mod_authn_otp.so
$ service httpd configtest
$ sudo systemctl restart httpd
ユーザーファイルを作る
$ vi ~/create_otp_userfile_sh
$ cat ~/create_otp_userfile_sh
#!/bin/bash -e
user=${1:?Usage: $0 username}
issuer=${2:-your_company_name}
secret=$(cat /dev/urandom | tr -dc 'a-z0-9' | fold -w 15 | head -n 1)
secret_base16=$(python -c "import base64; print base64.b16encode('${secret}')")
secret_base32=$(python -c "import base64; print base64.b32encode('${secret}')")
otpauth_uri="otpauth://totp/${issuer}:${user}?secret=${secret_base32}&issuer=${issuer}"
otpauth_uri=$(python -c "import urllib; print urllib.quote('${otpauth_uri}')")
qrcode_url="https://chart.googleapis.com/chart?chs=300x300&cht=qr&chl=${otpauth_uri}"

file="/var/www/otp/users"
if [ ! -f "${file}" ]; then
  [ -d $(dirname "$file") ] || mkdir -p $(dirname "$file")
  touch ${file}
  chown -R apache:apache $(dirname "$file")
fi
[ -w "${file}" ] || (echo "${file}: Permission denied" && exit 1)

count=$(awk "\$2 ~ /^$user}\$/" ${file} | wc -l)
if [ $count -le 0 ]; then
  echo "HOTP/T30 $(printf '%-12s' $user) - ${secret_base16}" >> ${file}
  echo "$qrcode_url"
else
  echo "User '$user' already exists"
fi
$ sudo ./create_otp_userfile_sh haray2 isaotestweb
出力されたURLにアクセスして、表示されたQRコードをアプリでスキャンして登録。
※ユーザーファイルの生成はこちらからスクリプトを借りました。
「引数にUsernameを指定して実行すると、必要な項目を埋めた行が /var/www/otp/users に追記され、標準出力にGoogle Authenticator登録用のQRコードが表示されるURLが出力されます。」という優しい仕様。ありがとうございます。
BASIC認証の設定
$ sudo vi /etc/httpd/conf/httpd.conf
$ diff /etc/httpd/conf/httpd.conf /etc/httpd/conf/httpd.conf.bak
159,170d158
< <Location />
<     AuthType Basic
<     AuthName "Mamoru OTP"
<     AuthBasicProvider OTP
<     Require valid-user
<     OTPAuthUsersFile /var/www/otp/users
<     OTPAuthMaxLinger 3600
<     OTPAuthMaxOTPFailure 20
<     OTPAuthPINAuthProvider file
<     OTPAuthLogoutOnIPChange On
< </Location>
$ service httpd configtest
$ sudo systemctl restart httpd
これで設定終わりです。 ブラウザからアクセスするとBASIC認証のダイアログが表示されるので、「ユーザー名」にはスクリプトで作成したユーザー名を、「パスワード」にはアプリに表示されているOTPを、それぞれ入力します。

CentOSの認証にTOTPを使う
個人的なメモを残しておきます。
前準備
$ sudo yum -y groupinstall "Development Tools"
$ sudo yum -y install pam-devel
Google Authenticatorのpamモジュールをインストールする
$ git clone https://github.com/google/google-authenticator-libpam.git
$ cd google-authenticator-libpam/
$ ./bootstrap.sh
$ ./configure
$ make
$ sudo make install
sshdとpamの設定
$ sudo cp /usr/local/lib/security/pam_google_authenticator.so /usr/lib64/security/
$ sudo cp -p /etc/ssh/sshd_config /etc/ssh/sshd_config.bak
$ sudo vi /etc/ssh/sshd_config
$ sudo diff /etc/ssh/sshd_config /etc/ssh/sshd_config.bak
82,83c82,83
< ChallengeResponseAuthentication yes
< #ChallengeResponseAuthentication no
---
> #ChallengeResponseAuthentication yes
> ChallengeResponseAuthentication no
$ sudo sshd -t
$ sudo systemctl restart sshd
$ sudo vi /etc/pam.d/google-auth
$ cat /etc/pam.d/google-auth
#%PAM-1.0
auth required pam_env.so
auth sufficient pam_google_authenticator.so try_first_pass
auth requisite pam_succeed_if.so uid >= 500 quiet
auth required pam_deny.so
$ sudo cp -p /etc/pam.d/sshd /etc/pam.d/sshd.bak
$ sudo vi /etc/pam.d/sshd
$ sudo diff /etc/pam.d/sshd /etc/pam.d/sshd.bak
3c3
< #auth       substack     password-auth
---
> auth       substack     password-auth
21,22d20
< auth substack google-auth
OTPの設定(このときにQRコードも表示されるのでアプリを設定する)
$ google-authenticator
sudoにも適用してみよう
$ sudo cp /etc/pam.d/sudo /etc/pam.d/sudo.bak
$ sudo vi /etc/pam.d/sudo
$ diff /etc/pam.d/sudo /etc/pam.d/sudo.bak
2d1
< auth       substack     google-auth